Automate Task Using Macro
There are a few helpful things you should know about macros:
When you record a macro for performing a set of tasks in a range in Excel, the macro will only run on the cells within the range. So if you added an extra row to the range, the macro will not run the process on the new row, but only the cells within the range.
If you have planned a long process of tasks to record, plan to have smaller relevant macros instead of having one long macro.
It is not necessary that only tasks in Excel can be recorded in a macro. Your macro process can extend to other Office applications, and any other applications that support Visual Basic Application (VBA). For example, you can record a macro where you first update a table in Excel and then open Outlook to email the table to an email address.
Follow these steps to record a macro.
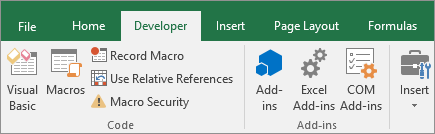
On the Developer tab, in the Code group, click Record Macro.
-OR-
Press Alt+T+M+R .
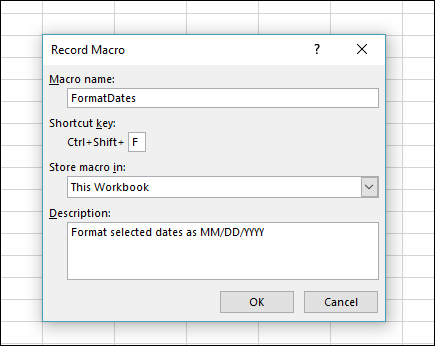
Record Macro In the Macro name box, enter a name for the macro. Make the name as descriptive as possible so you can quickly find it if you create more than one macro.
Note: The first character of the macro name must be a letter. Subsequent characters can be letters, numbers, or underscore characters. Spaces cannot be used in a macro name; an underscore character works well as a word separator. If you use a macro name that is also a cell reference, you may get an error message that the macro name is not valid.
To assign a keyboard shortcut to run the macro, in the Shortcut key box, type any letter (both uppercase or lowercase will work) that you want to use. It is best to use Ctrl + Shift (uppercase) key combinations, because the macro shortcut key will override any equivalent default Excel shortcut key while the workbook that contains the macro is open. For instance, if you use Ctrl+Z (Undo), you will lose the ability to Undo in that Excel instance.
In the Store macro in list, select where you want to store the macro.
In general, you’ll save your macro in the This Workbook location, but if you want a macro to be available whenever you use Excel, select Personal Macro Workbook . When you select Personal Macro Workbook, Excel creates a hidden personal macro workbook (Personal.xlsb) if it does not already exist, and saves the macro in this workbook.
In the Description box, optionally type a brief description of what the macro does.
Although the description field is optional, it is recommended you enter one. Also, try to enter a meaningful description with any information that may be useful to you or other users who will be running the macro. If you create a lot of macros, the description can help you quickly identify which macro does what, otherwise you might have to guess.
Click OK to start recording.
Perform the actions that you want to record.
On the Developer tab, in the Code group, click Stop Recording Button image .
-OR-
Press Alt+T+M+R .
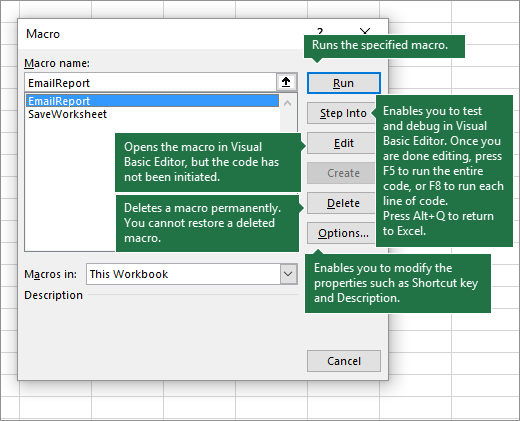
Working with recorded macros in Excel In the Developer tab, click Macros to view macros associated to a workbook. Or press Alt+ F8. This opens the Macro dialog box.
Macro dialog box
 Caution: Macros cannot be undone. Before you run a recorded macro for the first time, make sure that you’ve either saved the workbook where you want to run the macro, or better yet work on a copy of the workbook to prevent unwanted changes. If you run a macro and it doesn’t do what you want, you can close the workbook without saving it.


